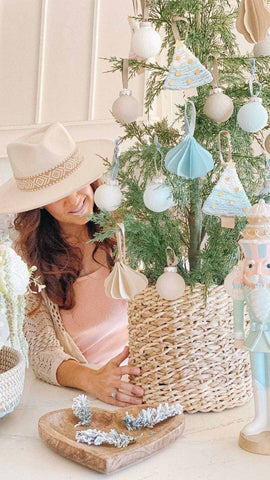
This year, step away from store-bought ornaments and embark on a delightful journey of crafting your very own DIY Christmas ornaments with our friend Trish, from @beautifulinspire.co! These three viral DIY ornaments are the perfect way to incorporate homemade pastel Christmas decorations into your home this holiday season - OR use your very own colors to match your existing decor!
Trish shared three of her favorite DIY Christmas ornaments with us, and an easy step by step guide on how to make them! We promise you're going to fall in LOVE with the outcome, and have so much fun during the process! Get ready to deck your halls with love, creativity, and the satisfaction of knowing that your Christmas tree tells a story as unique as your family. Let the crafting festivities begin!
Here’s what to expect from Trish’s recommendations:
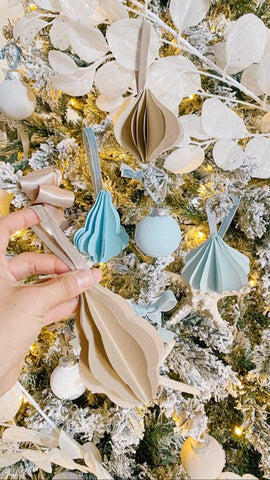
- How to make DIY paper ornaments
- How to make DIY felt ornaments
- How to make DIY yarn ornaments

1. DIY Paper Christmas Ornaments:

What you need:
- Card stock paper
- Scissors
- Ribbon
- Glue
Instructions:
Cut out the shape of your paper Christmas ornament on card stock paper or use a cutting machine to cut out 15 of them. I folded my card stock in half and folded the ornament over to cut down my cutting time. When you’re done, fold each one in half. Then add glue to one of the outside of the folded ornament. Attach the next ornament, then keep glueing each one until they’re all attached. When you get to the last one, glue the other side to the 1st folded ornament. This will create the accordion look. Then attach a folded ribbon to the back. Hang your beautiful diy paper Christmas ornaments on your tree and admire your work of art!
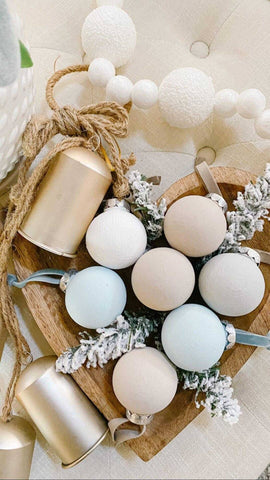
2. DIY Flocked Velvet Ornaments:

What you need:
- Clear ornaments
- Small Paint brush
- Paint
- Baking soda
Instructions:
Mix baking soda into your paint to get a thicker pudding-like consistency. If you want more texture and grain then add more baking soda. Paint clear ornament. You’ll need about 2-3 coats. Allow drying time in between. Add velvet ribbon to the top. Hang your beautiful flocked velvet ornaments on your Christmas tree for the ultimate pastel Christmas decorations!
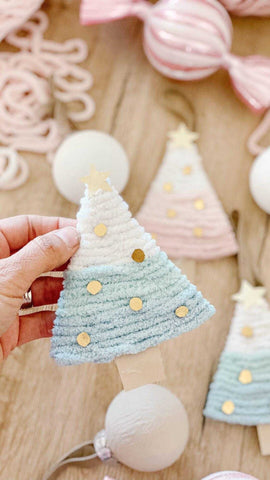
3. DIY Yarn Ornaments:

What you need:
- Card stock paper
- Scissors
- Ribbon
- Yarn
- Hot glue gun
Instructions:
Cut a Christmas tree shape out of brown card stock paper. Place hot glue on the top third of the tree. Wrap white yarn around the tree and press into glue. Then place hot glue on the second third of the tree. Wrap light pink yarn around the second third and press into glue. Next place hot glue on the lower third of the tree. Then wrap the darker pink yarn around that section. Press into glue. Cut out a paper star and glue to the top of the tree. Cut out mini gold circles and glue on top of the yarn so it looks like ornaments. Hot glue ribbon to the back of the ornament. Hang on your Christmas tree and admire your new pastel Christmas decorations!
As you admire your uniquely adorned tree this Christmas, take a moment to appreciate the love, laughter, and camaraderie that went into each handmade ornament. Whether you're surrounded by family, friends, or even crafting solo with a cup of cocoa, the process itself becomes a cherished part of the holiday experience.
From @beautifulinspire.co cozy crafting corner to yours, we wish you a season filled with warmth, creativity, and the joy that comes from embracing the beauty of a handmade Christmas. May your tree shine brightly with the magic of DIY ornaments and the love that went into creating them. Happy holidays!


Kris Timmermeyer-Rice
I love these DIY ornament designs/tutorials…the best part is that they don’t seem very difficult or time consuming! I’m going to make some of these with my son next week!! I LOVE when DS posts DIY tutorials on the blog!! Please keep posting more…Thank you and Merry Christmas to the entire DS team!!
———
Decor Steals replied:
Hi Kris!
Thank you SO much for the amazing and heartfelt comment! This is what the team loves to hear and what keeps us going. We can’t wait for you to create these memories with your son and be on the lookout for more DIY and style inspo to come!
XOXO DS Team
Leslie
These ornaments are all so beautiful!!
Thank you for taking time to share with us how to make them!
I can’t wait to try & make them myself this weekend!
———
Decor Steals replied:
Hi Leslie!
We are so glad you love them as much as we do! Happy decorating! Be sure to share your pics with us!
XOXO
Robin
They are so beautiful and seem to be an easy DYI for some of my older ornaments ty 👍🏼
———
Decor Steals replied:
Hi Robin!
What a great idea! We are so glad you loved the DIY projects, we can’t wait to see what you do with yours!
XOXO